 系统参数优化
# Centos系统优化
# 配置yum源
- centos
mv /etc/yum.repos.d/ /etc/yum.repos.d_bak && mkdir /etc/yum.repos.d
 curl -s -o /etc/yum.repos.d/CentOS-Base.repo http://mirrors.aliyun.com/repo/Centos-7.repo
 curl -s -o /etc/yum.repos.d/epel.repo http://mirrors.aliyun.com/repo/epel-7.repo # 或者yum按照epel源 yum install  epel-release
 sed -i -e '/mirrors.cloud.aliyuncs.com/d' -e '/mirrors.aliyuncs.com/d' /etc/yum.repos.d/CentOS-Base.repo #非阿里云ECS可修改
yum clean all && yum makecache
2
3
4
5
- Kylin Linux Advanced Server release V10 (Tercel)
[root@mes test]# cat /etc/yum.repos.d/kylin_aarch64.repo
###Kylin Linux Advanced Server 10 - os repo###

[ks10-adv-os]
name = Kylin Linux Advanced Server 10 - Os
baseurl = http://update.cs2c.com.cn/NS/V10/V10SP1.1/os/adv/lic/base/$basearch/
gpgcheck = 1
gpgkey=file:///etc/pki/rpm-gpg/RPM-GPG-KEY-kylin
enabled = 1

[ks10-adv-updates]
name = Kylin Linux Advanced Server 10 - Updates
baseurl = http://update.cs2c.com.cn/NS/V10/V10SP1.1/os/adv/lic/updates/$basearch/
gpgcheck = 1
gpgkey=file:///etc/pki/rpm-gpg/RPM-GPG-KEY-kylin
enabled = 1

[ks10-adv-addons]
name = Kylin Linux Advanced Server 10 - Addons
baseurl = http://update.cs2c.com.cn/NS/V10/V10SP1.1/os/adv/lic/addons/$basearch/
gpgcheck = 1
gpgkey=file:///etc/pki/rpm-gpg/RPM-GPG-KEY-kylin
enabled = 0
2
3
4
5
6
7
8
9
10
11
12
13
14
15
16
17
18
19
20
21
22
23
- 安装常用工具
yum install screen net-tools vim tree lrzsz wget unzip telnet bash-completion iftop iotop ntpdate -y
# 修改网卡名为eth0
- centos修改网卡名为eth0
在安装系统的时候,如果在下图没有添加内容 net.ifnames=0 biosdevname=0,则网卡名为 ens33 或者别的网卡命名
光标在“Install CentOS7”按Tab键,quite前面加“net.ifnames=0 biosdevname=0”

如果在上一步没有做那个操作也可以在安装完系统修改
# 统一网卡名称为ethx
sudo cp /etc/default/grub /etc/default/grub_bak
sudo sed -i 's/GRUB_CMDLINE_LINUX="\(.*\)"/GRUB_CMDLINE_LINUX="net.ifnames=0 cgroup_enable=memory swapaccount=1 biosdevname=0 \1"/g' /etc/default/grub;
sudo grub2-mkconfig -o /boot/grub2/grub.cfg

#修改网卡配置/etc/sysconfig/network-scripts/ifcfg-ens33
#注意修改网卡配置如果修改错了,可能会出现网卡连不上,如果是IDC机房那就尴尬了,“如果是远程控制:”建议是把网卡配置备份一下,再加个定时任务,去覆盖网卡配置,定时重启,如果配置没有问题再把定时任务去掉

# 重启网卡: service network restart
2
3
4
5
6
7
8
9
10
- centos网卡配置
cat /etc/sysconfig/network-scripts/ifcfg-eth0
TYPE=Ethernet
BOOTPROTO=static
NAME=eth0
DEVICE=eth0
ONBOOT=yes
IPADDR=192.168.5.147
NETMASK=255.255.255.0
GATEWAY=192.168.5.1
DNS1=223.5.5.5
DNS2=114.114.114.114
2
3
4
5
6
7
8
9
10
11
12
- ping IP
监控ping IP: timeout 5 ping -q -A -s 500 -W 1000 -c 100 192.168.5.173 |grep transmitted |awk '{print $6}'
- 关闭防火墙
# 关闭 Selinux ,临时关闭,0 表示关闭,1,表示开启
getenforce

setenforce 0
sed -ri 's#(^SELINUX=).*#\1disabled#g' /etc/selinux/config #永久关闭

systemctl disable firewalld.service --now
2
3
4
5
6
7
# 磁盘格式化,与扩容
#查看现有的数据盘
fdisk -l

#格式化磁盘,例如腾讯云服务器,默认新加的硬盘名为 /dev/vdb
mkfs.ext4  /dev/vdb

#查看文件系统
blkid  /dev/vdb

#添加到开机自启动挂载,也可以把 /dev/vdb改成 UUID=XXX-XXX-XXX-XXX
echo '/dev/vdb /data                       ext4    defaults        0 0' >> /etc/fstab

#检查fstab文件格式,挂载磁盘
mount -a

#查看磁盘空间
df -h
2
3
4
5
6
7
8
9
10
11
12
13
14
15
16
17
18
- xfs
#通过以上方式挂载的,扩容无需卸载
xfs_growfs   /data
2
- ext4
#扩容,需要卸载磁盘
umount /data

#执行以下命令,安装growpart扩容工具,gdisk软件包。
yum install cloud-utils-growpart gdisk

#通过growpart进行扩容
growpart /dev/vdb 1


e2fsck -f /dev/vdb1
resize2fs /dev/vdb1
mount /dev/vdb1 /data
2
3
4
5
6
7
8
9
10
11
12
13
- 逻辑卷扩容
查看lvm卷组

lvdisplay  #获取  LV Path 的路径为:/dev/ubuntu-vg/ubuntu-lv
vgdisplay

扩容200G:lvextend -L +200G /dev/ubuntu-vg/ubuntu-lv

扩容全部:lvextend -l +100%FREE /dev/ubuntu-vg/ubuntu-lv


#ext4文件系统执行命令
resize2fs  /dev/ubuntu-vg/ubuntu-lv

#如果是xfs文件系统执行命令
xfs_growfs /dev/ubuntu-vg/ubuntu-lv
2
3
4
5
6
7
8
9
10
11
12
13
14
15
16
- 创建逻辑卷、挂载
#创建空的目录
mkdir /data

#查看有哪些卷,可以看到 在 /dev/ubuntu-vg 下有空闲的362G
lvdisplay

#创建一个卷名 data 的逻辑卷,在ubuntu-vg 下面
1vcreate -L 362G -n data ubuntu-vg

#格式化data逻辑卷
mkfs.ext4 /dev/ubuntu-vg/data

#挂载逻辑卷
mount /dev/ubuntu-vg/data /data

#设置开机自挂载
echo '/dev/ubuntu-vg/data /data ext4 defaults 0 0' >>/etc/fstab

#检查并挂载
mount -a

#检查
df -h
2
3
4
5
6
7
8
9
10
11
12
13
14
15
16
17
18
19
20
21
22
23
# 系统优化
- 系统文件句柄优化
cat >> /etc/security/limits.conf <<EOF
* soft nofile 65535
* hard nofile 65536
hive   - nofile 65535
hive   - nproc  65535
EOF

sed -i 's#4096#65535#g'   /etc/security/limits.d/20-nproc.conf  # 加大普通用户限制  也可以改为unlimited
2
3
4
5
6
7
8
- 终端无操作自动断开
cat >>/etc/profile<<'OPO'
export TIME_STYLE='+%Y/%m/%d %H:%M:%S'
export HISTTIMEFORMAT='%F %T '
ulimit -n 65535
export TMOUT=600
HISTSIZE=10000
HISTFILESIZE=10000
OPO
source /etc/profile # 使设置立即生效
2
3
4
5
6
7
8
9
- openssh 优化
sed -i 's/#UseDNS yes/UseDNS no/' /etc/ssh/sshd_config # 禁用 dns 解析
sed -i '/^GSS/s/yes/no/g' /etc/ssh/sshd_config  # 禁用GSSAPI认证加快登录速度
systemctl restart sshd
2
3
- ssh登录失败锁定用户
配置文件:/etc/pam.d/sshd 添加内容
auth required pam_tally2.so onerr=fail deny=3 unlock_time=60 even_deny_root root_unlock_time=60
查看登录失败次数,成功则清零:pam_tally2 -u root
清零:pam_tally2 -u root -r
重启sshd服务:service sshd restart
- 强密码复杂度修改
配置文件添加内容,密码复杂度: /etc/security/pwquality.conf
minlen = 12 #密码长度
minclass = 3  #至少三位复杂度
dcredit = -1  #至少包含一个
ucredit = -1  #至少包含一个大写字母
lcredit = -3  #至少包含一个至少包含三个字母
ocredit = -1  #至少包含一个特殊字符
remember = 3  #记录最近密码三个
enforce_for_root  #即使是root用户设置密码,也应强制执行复杂性策略
2
3
4
5
6
7
8
- 关闭邮箱
systemctl disable postfix.service --now
- 更新软件及系统版本
yum update \
&& yum upgrade
2
- ssh服务登录防护
Port 52223                             # 变更SSH服务远程连接端口
PermitRootLogin prohibit-password     # 禁止root用户使用密码登录,但可以通过密钥登录
PasswordAuthentication  yes           # 允许使用密码直接远程登录,只有普通用户可登录(结合上一条)
UseDNS                  no            # 禁止ssh进行dns反向解析,影响ssh连接效率参数
GSSAPIAuthentication    no            # 禁止GSS认证,减少连接时产生的延迟
2
3
4
5
6
- 添加swap虚拟内存
dd if=/dev/zero of=/mnt/swap bs=1M count=8192
mkswap /mnt/swap
chmod 600 /mnt/swap
swapon /mnt/swap
echo 5 > /proc/sys/vm/swappiness #修改虚拟内存使用积极度,centos默认30

#添加开机自启动
echo '/mnt/swap swap swap defaults 0 0' >> /etc/fstab
echo 'vm.swappiness = 5' >> /etc/sysctl.conf
echo '/usr/sbin/swapon -a' >> /etc/rc.local
2
3
4
5
6
7
8
9
10
# centos7 重置密码
重启centos7系统主机
在GRUB引导界面,按 e 进入编辑模式
找到以 "linux16" 开头的行,在末尾加入
rd.break, 按 CTRL + X 启动,系统将进入救援模式
mount -o remount,rw /sysroot
chroot /sysroot

passwd root  #输入新的密码
exit
reboot
2
3
4
5
6
# centos内核升级
注意!!! 需要重启服务器
下载地址
coreix内核下载地址 (opens new window)
- 查看内核版本
# uname  -r
5.15.11-1.el7.elrepo.x86_64

# uname  -a
Linux basic 5.15.11-1.el7.elrepo.x86_64 #1 SMP Tue Dec 21 13:17:11 EST 2021 x86_64 x86_64 x86_64 GNU/Linux


# cat /etc/redhat-release
CentOS Linux release 7.9.2009 (Core)
2
3
4
5
6
7
8
9
# 启用ELRepo 仓库
ELRepo 仓库是基于社区的用于企业级 Linux 仓库,提供对 RedHat Enterprise (RHEL) 和 其他基于 RHEL的 Linux 发行版(CentOS、Scientific、Fedora 等)的支持。
导入ELRepo仓库的公共密钥
rpm --import https://www.elrepo.org/RPM-GPG-KEY-elrepo.org
# 安装ELRepo 仓库的yum源
rpm -Uvh http://www.elrepo.org/elrepo-release-7.0-3.el7.elrepo.noarch.rpm
查看内核包信息
yum --disablerepo="*" --enablerepo="elrepo-kernel" list available
安装最新版本内核,按y 确认
--enablerepo 选项开启 CentOS 系统上的指定仓库。默认开启的是 elrepo,这里用 elrepo-kernel 替换。
kernel-ml 是最新稳定版本,kernel-lt是长期维护版
yum --enablerepo=elrepo-kernel install kernel-lt
# 设置grub2
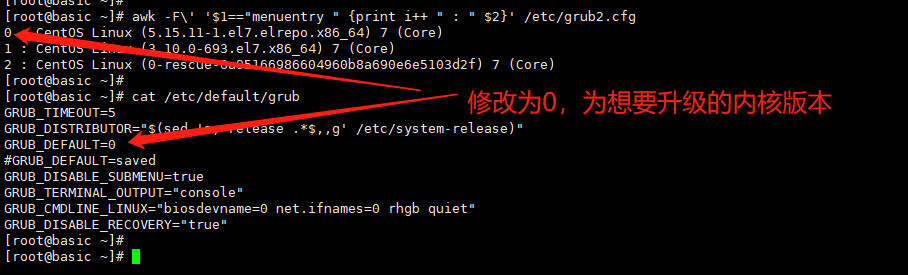
- 查看系统上所有的内核版本:
awk -F\' '$1=="menuentry " {print i++ " : " $2}' /etc/grub2.cfg
grub2-set-default 0 #指定0 标签内核
- 设置内核版本
vi /etc/default/grub
GRUB_TIMEOUT=5
GRUB_DISTRIBUTOR="$(sed 's, release .*$,,g' /etc/system-release)"
GRUB_DEFAULT=0
#GRUB_DEFAULT=saved  #
GRUB_DISABLE_SUBMENU=true
GRUB_TERMINAL_OUTPUT="console"
GRUB_CMDLINE_LINUX="biosdevname=0 net.ifnames=0 rhgb quiet"
GRUB_DISABLE_RECOVERY="true"
2
3
4
5
6
7
8
9
- 生效配置
grub2-mkconfig -o /boot/grub2/grub.cfg
- 重启服务器
reboot
# 内核参数优化
- 常见内核参数
#使用swap积极度
vm.swappiness=10

#内核转发,docker需要开启
net.ipv4.ip_forward=1

#打开文件数量
fs.file-max=2097152
fs.inotify.max_user_instances=8192
fs.inotify.max_queued_events=16384

# 可以控制core文件的文件名中是否添加pid作为扩展。
kernel.core_uses_pid=1

# 云服务器tcp TIME_WAI连接优化,
如果您的本地网络是NAT共享方式上网,(tcp_tw_recycle和tcp_timestamps)两个参数可能引起NAT环境和目标Linux相关内核参数配置不匹配,可能导致无法在本地网络环境通过SSH连接Linux实例

# 允许将TIME-WAIT sockets重新用于新的TCP连接
net.ipv4.tcp_tw_reuse = 1

# TCP连接中TIME-WAIT sockets的快速回收
net.ipv4.tcp_tw_recycle = 1

# 开启SYN Cookies。当出现SYN等待队列溢出时,启用cookies来处理,可防范少量SYN攻击
net.ipv4.tcp_syncookies = 1

# 修改系統默认的 TIMEOUT 时间
net.ipv4.tcp_fin_timeout = 30

# 定义网络连接可用作其源(本地)端口的最小和最大端口的限制,同时适用于TCP和UDP连接
net.ipv4.ip_local_port_range = 1024 65535

# 定义了系统中每一个端口最大的监听队列的长度,对于web服务环境来说,默认的 128 太小
net.core.somaxconn = 1024

# 当TIME_WAIT 数量等于 tcp_max_tw_buckets 时,不会有新的 TIME_WAIT 产生,注意ip_local_port_range 的范围
net.ipv4.tcp_max_tw_buckets = 64500

# 源路由验证
net.ipv4.conf.all.rp_filter=0
net.ipv4.conf.default.rp_filter=0
net.ipv4.conf.default.arp_announce = 2
net.ipv4.conf.lo.arp_announce=2
net.ipv4.conf.all.arp_announce=2

# see details in https://help.aliyun.com/knowledge_detail/41334.html
net.ipv4.tcp_max_tw_buckets=5000
net.ipv4.tcp_syncookies=1
net.ipv4.tcp_fin_timeout=30
net.ipv4.tcp_synack_retries=2
kernel.sysrq=1
2
3
4
5
6
7
8
9
10
11
12
13
14
15
16
17
18
19
20
21
22
23
24
25
26
27
28
29
30
31
32
33
34
35
36
37
38
39
40
41
42
43
44
45
46
47
48
49
50
51
52
- 对于前端nginx服务器,可以添加以下参数
net.ipv4.tcp_tw_recycle = 0
net.ipv4.tcp_tw_reuse = 1
net.ipv4.tcp_max_tw_buckets = 64500
net.ipv4.tcp_fin_timeout = 30
net.core.somaxconn = 1024
net.ipv4.ip_local_port_range = 1024 65535
fs.file-max=2097152
fs.inotify.max_user_instances=8192
fs.inotify.max_queued_events=16384
2
3
4
5
6
7
8
9
10
- 查看系统参数
sysctl -a
- 生效
sysctl -p
#http://download.yfklife.cn/blog/ops/basic/CentOS-Base.repo
#http://download.yfklife.cn/blog/ops/basic/epel.repo
#http://download.yfklife.cn/blog/ops/basic/docker-ce.repo
2
3
# Ubuntu基础配置
# ubuntu配置源
- 22.04
cp /etc/apt/sources.list{,.bak}
cat >/etc/apt/sources.list<<EOF
deb https://mirrors.tuna.tsinghua.edu.cn/ubuntu/ jammy main restricted universe multiverse
deb https://mirrors.tuna.tsinghua.edu.cn/ubuntu/ jammy-updates main restricted universe multiverse
deb https://mirrors.tuna.tsinghua.edu.cn/ubuntu/ jammy-backports main restricted universe multiverse
#deb http://security.ubuntu.com/ubuntu/ jammy-security main restricted universe multiverse
EOF
2
3
4
5
6
7
- 20.04
mv /etc/apt/sources.list /etc/apt/sources.list-bak
cat >/etc/apt/sources.list<<EOF
deb http://mirrors.tuna.tsinghua.edu.cn/ubuntu/ focal main restricted universe multiverse
deb http://mirrors.tuna.tsinghua.edu.cn/ubuntu/ focal-updates main restricted universe multiverse
deb http://mirrors.tuna.tsinghua.edu.cn/ubuntu/ focal-backports main restricted universe multiverse
deb http://mirrors.tuna.tsinghua.edu.cn/ubuntu/ focal-security main restricted universe multiverse
EOF
2
3
4
5
6
7
- 18.04
mv /etc/apt/sources.list /etc/apt/sources.list-bak
cat >/etc/apt/sources.list<<EOF
deb http://mirrors.tuna.tsinghua.edu.cn/ubuntu/ bionic main restricted universe multiverse
deb http://mirrors.tuna.tsinghua.edu.cn/ubuntu/ bionic-updates main restricted universe multiverse
deb http://mirrors.tuna.tsinghua.edu.cn/ubuntu/ bionic-backports main restricted universe multiverse
deb http://mirrors.tuna.tsinghua.edu.cn/ubuntu/ bionic-security main restricted universe multiverse
EOF
2
3
4
5
6
7
- 报错提示:【Could not handshake: Error in the certificate verification】
在app update的时候遇到的问题,修改 sources.list 内容,里面的https为http sed -i 's#https#http#g' /etc/apt/sources.list,或者 sudo apt-get install --reinstall ca-certificates
更新源
sudo apt-get update
修复损坏的软件包,尝试卸载出错的包,并重新安装正确的版本
sudo apt-get -f install
更新软件
sudo apt-get upgrade
# 网络
- ubuntu修改网络为eth0
# 统一网卡名称为ethx
sudo cp /etc/default/grub /etc/default/grub_bak
sudo sed -i 's#GRUB_CMDLINE_LINUX=.*#GRUB_CMDLINE_LINUX="net.ifnames=0 biosdevname=0"#g' /etc/default/grub
sudo grub-mkconfig -o /boot/grub/grub.cfg

#修改网卡配置/etc/netplan/xxx.yaml 网卡名eth0
#注意修改网卡配置如果修改错了,可能会出现网卡连不上,如果是IDC机房那就尴尬了,“如果是远程控制:”建议是把网卡配置备份一下,再加个定时任务,去覆盖网卡配置,定时重启,如果配置没有问题再把定时任务去掉

reboot #重启服务器
2
3
4
5
6
7
8
9
- 修改默认ssh 配置
cp /etc/ssh/sshd_config{,.bak}
Include /etc/ssh/sshd_config.d/*.conf
HostKey /etc/ssh/ssh_host_rsa_key
HostKey /etc/ssh/ssh_host_ecdsa_key
HostKey /etc/ssh/ssh_host_ed25519_key
PermitRootLogin prohibit-password  #root密码只能密钥登录,修改yes,允许密码登录
PubkeyAuthentication yes
AuthorizedKeysFile	.ssh/authorized_keys .ssh/authorized_keys2
KbdInteractiveAuthentication no
UsePAM yes
X11Forwarding yes
PrintMotd no
UseDNS no
AcceptEnv LANG LC_*
Subsystem	sftp	/usr/lib/openssh/sftp-server
PubkeyAcceptedAlgorithms=+ssh-rsa
2
3
4
5
6
7
8
9
10
11
12
13
14
15
Ubuntu网卡配置
- 20.04
cat /etc/netplan/00-installer-network-config.yaml
# Let NetworkManager manage all devices on this system
network:
  version: 2
  renderer: networkd
  ethernets:
    eth0:
      dhcp4: no
      dhcp6: no
      addresses: [192.168.5.65/24]
      gateway4: 192.168.5.1
      nameservers:
        addresses: [114.114.114.114]
2
3
4
5
6
7
8
9
10
11
12
13
- 22.04
network:
  ethernets:
    ens33:
      addresses:
      - 192.168.108.130/24
      nameservers:
        addresses: [223.5.5.5]
      routes:
      - to: default
        via: 192.168.108.2
  version: 2
2
3
4
5
6
7
8
9
10
11
- 配置dns不生效,调整resolved
echo 'DNSStubListener=no' >> /etc/systemd/resolved.conf
systemctl restart systemd-resolved.service
2
生效网卡配置
netplan apply
# 其他
安装常用命令和服务
apt install bash-completion telnet tree lrzsz curl net-tools vim iftop unzip wget openssh-server ntpdate
添加超级补全到环境变量
cat >>~/.bashrc<<EOF
if [ -f /etc/bash_completion ]; then
   . /etc/bash_completion
fi
EOF
tail ~/.bashrc
source ~/.bashrc
2
3
4
5
6
7
- openstack ubuntu22.04镜像
#!/bin/bash
echo "UseDNS no" >> /etc/ssh/sshd_config
echo "PermitRootLogin yes" >> /etc/ssh/sshd_config
echo "PubkeyAcceptedAlgorithms=+ssh-rsa" >> /etc/ssh/sshd_config
sed -i 's#PasswordAuthentication no#PasswordAuthentication yes#g' /etc/ssh/sshd_config.d/60-cloudimg-settings.conf
service ssh restart
2
3
4
5
6
- ssh 找不到匹配的host key算法
HostKeyAlgorithms +ssh-rsa
PubkeyAcceptedKeyTypes +ssh-rsa
KexAlgorithms curve25519-sha256@libssh.org,ecdh-sha2-nistp256,ecdh-sha2-nistp384,ecdh-sha2-nistp521,diffie-hellman-group14-sha1
2
3
# 个人存储下载地址。。。
https://mirrors.coreix.net/elrepo-archive-archive/kernel/el7/x86_64/RPMS/kernel-lt-5.4.278-1.el7.elrepo.x86_64.rpm
https://mirrors.coreix.net/elrepo-archive-archive/kernel/el7/x86_64/RPMS/kernel-lt-5.4.275-1.el7.elrepo.x86_64.rpm
https://mirrors.coreix.net/elrepo-archive-archive/kernel/el7/x86_64/RPMS/kernel-lt-devel-5.4.275-1.el7.elrepo.x86_64.rpm

kernel-ml-5.15.11-1.el7.elrepo.x86_64.rpm
kernel-lt-5.4.278-1.el7.elrepo.x86_64.rpm
2
3
4
5
6